
How to Build a Closed Terrarium: Step-by-Step Guide

To build a closed terrarium, layer a clear glass container with a tight lid in this order: drainage (LECA or gravel), a mesh or moss barrier, a thin band of activated charcoal, then substrate. Plant humidity-loving species like moss and small ferns, add springtails as a living cleanup crew, mist lightly, and seal the lid. Set it in bright indirect light, never direct sun. Over the first two weeks, crack the lid in intervals to balance the condensation. Done right, a closed terrarium recycles its own water and can go weeks, sometimes months, without you touching it.
That is the whole method in one paragraph. The rest of this guide is the “why” behind each step, because the shortcuts that look harmless on build day are the ones that come back weeks later. Most build guides online were written for a cool Western room. This one is written for the climate where mold is the default enemy. If you are still deciding whether yours should even have a lid, read open vs closed terrarium first, then come back here.
What a closed terrarium actually is
A closed terrarium is not a plant in a jar. It is a sealed water cycle. Moisture evaporates from the substrate and the leaves, hits the cool glass, condenses, and runs back down. The same water goes around and around. That is why a balanced closed terrarium barely needs watering: you are not feeding it water, you are keeping a small rain forest looping under a lid.
Understanding this changes how you build. Every layer exists to keep that loop clean and stable. Get the loop right and the terrarium runs itself. Get it wrong, usually by trapping too much water with nothing to manage it, and you get the white fuzz and fogged glass that made you search for this article.
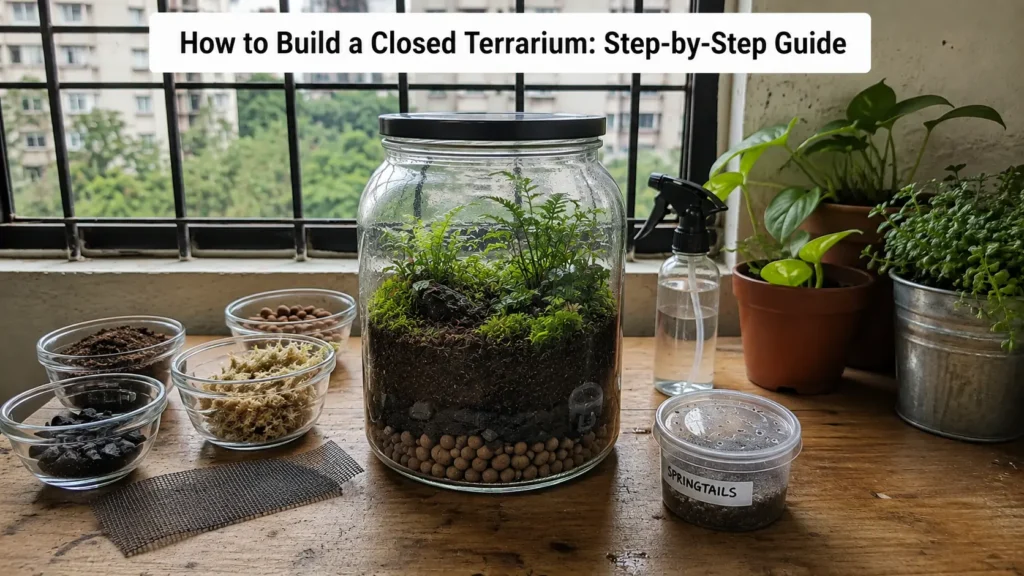
What you need (brand-neutral, recycled is fine)
You do not need a kit. My first successful builds came out of jars I already owned. Here is the honest list:
- A clear glass container with a lid that seals. A large mason jar, an old cookie jar, a lidded fish bowl, an apothecary jar. It must be clear (colored glass starves the plants of light) and you must be able to get your hand or a tool inside.
- Drainage media: LECA (lightweight expanded clay balls) or clean aquarium gravel.
- A barrier layer: plastic window mesh cut to fit, or a pad of sphagnum moss.
- Activated charcoal (the horticultural or aquarium kind, not a barbecue briquette).
- Substrate: a loose terrarium mix, not garden soil (more on this below).
- Plants: humidity lovers that stay small. See best plants for a closed terrarium.
- Springtails: a small starter culture of these tiny detritivores.
- A spray bottle for misting.
Long tweezers or a chopstick help for planting in a narrow jar, but they are optional.
Step 1: Choose and sterilize the container
Wash the container in hot, soapy water and rinse it completely, then dry it. In a humid climate this step is not optional. Any leftover sugar residue, food film, or soap is a launch pad for mold in an environment you are about to seal shut. I learned this the expensive way: a jar that “looked clean” fogged over and grew fuzz within a week because I skipped a proper rinse.
Skip it and: you seed mold before the plants even go in.
Step 2: The drainage layer
Add roughly one inch of LECA or gravel to the bottom. This is the reservoir where excess water collects, below the root zone, so roots are not sitting in a swamp. Scale it to the container: a tall jar can take a little more, a shallow bowl a little less, but one inch is a safe baseline.
LECA versus gravel is a real choice. Gravel is cheap and drains purely. LECA is lighter, porous, and holds a little moisture that it wicks back slowly, which nudges humidity up. In a dry room I would lean LECA. In an already-humid tropical room, I often lean toward plain gravel or a slightly deeper drainage layer, because my problem is never too little moisture, it is too much.
Skip it and: water pools at the roots and they rot.
Step 3: The barrier layer
Lay your plastic mesh or a thin pad of sphagnum moss directly over the drainage. Its only job is to stop the substrate from slowly washing down into the drainage layer, which would clog your reservoir and turn the whole base into wet mud. Cut the mesh to the container’s shape so there are no big gaps at the edges.
Skip it and: the layers merge over a few months, and your carefully built reservoir disappears into soil.
Step 4: Activated charcoal
Sprinkle a thin band, about a quarter inch, over the barrier. Here is where I want to be accurate, because a lot of pages oversell this layer. Activated charcoal adsorbs some odors and impurities and adds surface area for beneficial microbes to colonize, which helps keep a sealed environment from going sour. What it does not do is “purify the water” forever or single-handedly prevent mold. It is a helpful buffer, not a magic filter. Use it, but do not treat it as your mold insurance. Your cleanup crew and your watering discipline do that job.
Skip it and: the closed air can turn stale faster, especially if something starts to decay.
Step 5: The substrate
Add one to two inches of a loose terrarium mix. Please do not use straight garden soil or topsoil. Garden soil compacts into an airless block when sealed, it drains poorly, and it often arrives carrying fungus gnat eggs and other hitchhikers you do not want in a closed jar. A workable mix is something along the lines of coco coir for structure, a little orchid bark for air, and a pinch of charcoal. It should hold moisture without turning to sludge.
Contour it while you are here. A gentle slope, higher at the back, gives you depth to plant into and makes the finished terrarium look like a landscape instead of a flat green mat.
Skip it and: compacted soil suffocates roots and traps standing water.
Step 6: Planting
Now the fun part. Make a small well in the substrate, tuck the root ball in, and firm the mix around it. Place taller plants toward the back or center and low, spreading plants like moss toward the front and edges. Leave real space between plants: they will grow, and a jar crammed full on day one becomes an overgrown, poorly ventilated mess in a month, which is exactly the condition mold loves.
Choose plants that genuinely tolerate a sealed, humid jar. Moss, small ferns, fittonia, and peperomia are reliable starters. If you are nervous or forgetful, start with the hardiest options in low-maintenance terrarium plants and build confidence from there. One thing to burn into memory: succulents, cacti, and air plants do not belong in a closed terrarium. They need dry, airy conditions and they will rot in sealed humidity. That mix-up is one of the most common beginner mistakes I see.
A piece of hardscape (a clean stone, a bit of driftwood) adds interest and gives moss something to creep over. Rinse anything you add.
Step 7: Add the cleanup crew (springtails from day one)
This is the step almost every other guide leaves out, and it is the step that separates a terrarium that lasts from one that molds. Springtails are tiny, harmless detritivores. They graze constantly on mold, fungi, algae, and decaying plant matter, and they do not touch your living plants. In a sealed, humid environment, a little mold is not a question of if but when. Springtails are the crew that eats it before it spreads.
Tip the starter culture in near the moss and substrate and leave them to it. They will settle into the leaf litter and multiply quietly. I add them at build time on every single tank now, not after a problem appears. Waiting until you see fuzz means you are already fighting a fire instead of preventing one.
Skip it and: the first bloom of mold has nothing to keep it in check.
Step 8: The first watering (less is more)
Mist the terrarium lightly with a spray bottle. Do not pour. The goal is a substrate that is evenly damp, not wet, with no visible water sitting in the drainage layer. This is the single easiest place to overdo it, and overwatering is the number one killer of first terrariums. You can always add a spritz tomorrow. You cannot easily take water back out of a sealed jar.
In a humid tropical room, err even drier than a Western guide tells you to. Your ambient air is already carrying moisture into the system every time the lid is off.
Step 9: The break-in schedule (read the condensation)
Do not seal it and walk away. For the first week or two, the terrarium is finding its balance, and condensation is your gauge. A little light fog on the glass in the morning that clears through the day is exactly right. Heavy fog that never clears, or water running in sheets, means too much moisture is trapped.
The method: seal the lid, then check the glass. If it stays heavily fogged all day, take the lid off for a few hours to vent, then reseal. Repeat daily until you settle into a state where only a light, passing fog appears. In a dry room this can take a couple of days. In a humid Dhaka-style room it takes longer and more venting, because the ambient air keeps topping up the moisture every time you open it. Be patient, vent more often, and lean drier. This is guidance, not a stopwatch: read your own glass, not the clock.
If fuzz or heavy fog is already stressing you out, my full triage lives in terrarium mold and condensation.
Step 10: Placement and light
Set the finished terrarium in bright, indirect light. A spot near a window that gets plenty of daylight but no direct beam is ideal. Never put a closed terrarium in direct sun. Sealed glass in direct sunlight acts like a tiny greenhouse and the temperature inside spikes fast enough to cook your plants within hours. I have watched a fern go from healthy to stewed in an afternoon on a sunny sill. Bright, but shaded from the direct beam, is the rule.
What can go wrong in the first two weeks
The first fortnight is where most terrariums die, and it is almost always one of a short list of causes. I wrote a whole post about my own first failure, “I Killed My First Terrarium in Two Weeks”, and the same culprits show up again and again:
- Overwatering. Too much water at the start, no way to remove it. Vent and lean drier.
- Direct sun. Cooked plants from greenhouse heat. Move to bright indirect.
- No cleanup crew. Mold with nothing eating it. Add springtails.
- A dirty container. Mold seeded before planting. Sterilize next time.
- Wrong plants. A succulent rotting in a sealed jar. Match the plant to the setup.
Catch these early and a terrarium is very forgiving. Ignore the fogged glass for a week and you are usually rebuilding.
Quick-reference build table
| Step | Layer / action | Rough amount | Why it matters |
|---|---|---|---|
| 1 | Sterilize container | Hot soapy wash | Removes mold food before sealing |
| 2 | Drainage (LECA/gravel) | ~1 inch | Reservoir below the roots |
| 3 | Barrier (mesh/moss) | Thin | Keeps substrate out of drainage |
| 4 | Activated charcoal | ~1/4 inch | Buffers odor, seeds microbes |
| 5 | Substrate (not garden soil) | 1 to 2 inches | Holds moisture, stays airy |
| 6 | Plant | Spaced for growth | Humidity lovers only |
| 7 | Springtails | Starter culture | Living mold control |
| 8 | First mist | Light spray | Damp, never wet |
| 9 | Break-in / vent | Days to weeks | Balance the condensation |
| 10 | Placement | Bright indirect | No direct sun ever |
Every step, in more depth
Each stage above has its own guide, because the ten-step version is deliberately compressed and most of the questions people actually hit live inside a single step.
Getting the layers right
- Closed terrarium layers: how deep each one goes, by jar size
- The drainage layer: gravel, LECA, or nothing
- Do you actually need activated charcoal?
- Substrate: why garden soil fails in a sealed jar
Preparing and building
- Sterilizing the jar, the substrate and the hardscape before you plant
- Hardscape: wood, bark and stone that will not rot the build
- Best plants for a closed terrarium
- Low-maintenance terrarium plants, ranked by neglect tolerance
The first weeks
- The first watering: how little water a sealed jar actually needs
- The break-in schedule: when to seal the lid for good
- How long before a closed terrarium actually stabilizes
Building in a wet climate
If something has already gone wrong and you cannot put a name to it, terrarium troubleshooting works backward from what you can see on the glass, in the substrate, and in the smell.
Frequently asked questions
Do closed terrariums need holes or air?
No. A closed terrarium is meant to be sealed. It runs on an internal water cycle where moisture evaporates, condenses on the glass, and returns to the soil. The plants and microbes exchange gases inside the sealed environment. You open it during the break-in period to balance moisture, and occasionally afterward if condensation gets too heavy, but it does not need permanent ventilation holes.
How long can a closed terrarium go without opening?
Once it is balanced, a healthy closed terrarium can go weeks and often months without opening or watering, because it recycles its own moisture. Check it visually every so often: light morning fog that clears is a sign it is happy. You only need to step in if the glass stays heavily fogged, the substrate looks dry, or a plant is struggling.
Do I really need activated charcoal?
It helps but it is not magic. Charcoal adsorbs some odors and impurities and gives beneficial microbes surface area to grow on, which keeps a sealed environment from going stale. It does not purify water indefinitely or prevent mold on its own. Your springtails and careful watering do the real work. I include a thin charcoal layer on every build, but I do not rely on it as mold insurance.
Can I build one in a mason jar I already have?
Yes. A clean mason jar with a sealing lid is a perfect first closed terrarium, and starting with a container you already own is exactly how I recommend beginners begin. It must be clear glass and washed thoroughly first. Recycled jars, old cookie jars, and lidded bowls all work as long as the lid seals and light can get through.
Why did my last sealed jar go moldy?
Usually one of three reasons: too much water trapped at the start, no cleanup crew to eat the first mold, or a container that was not properly cleaned before sealing. High ambient humidity makes all three worse, which is why tropical-climate builds mold so easily. The fix is drier watering, springtails from day one, and a sterilized jar. If you are fighting fuzz right now, the full diagnosis and rescue steps are in terrarium mold and condensation.