
First Terrarium Build: Step by Step, Mistakes Marked

A closed terrarium is built in a fixed order: container, drainage layer, optional barrier, substrate, hardscape, plants, first watering, then a break-in period before the lid stays sealed for good. Nearly every first-build failure traces back to one of a handful of predictable mistakes made at a specific step in that sequence, not to bad luck. This guide walks the sequence in order and marks the mistake at each step, so you can catch it before it happens rather than diagnose it two weeks later.
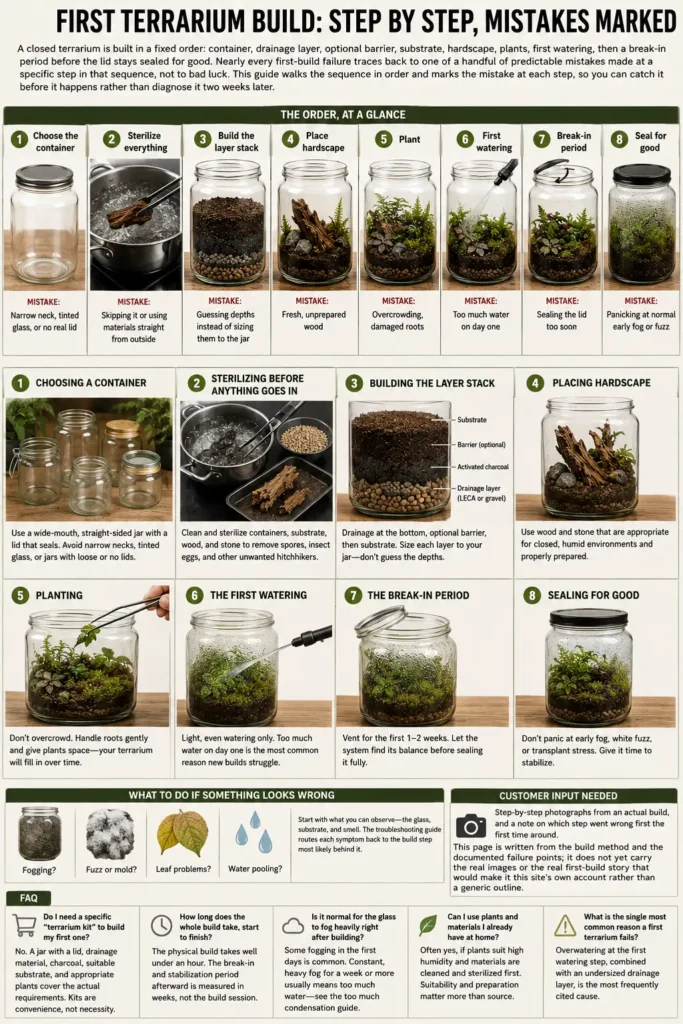
The order, at a glance
| Step | What happens | The mistake that happens here |
|---|---|---|
| 1 | Choose the container | Narrow neck, tinted glass, or no real lid |
| 2 | Sterilize everything | Skipping it or using materials straight from outside |
| 3 | Build the layer stack | Guessing depths instead of sizing them to the jar |
| 4 | Place hardscape | Fresh, unprepared wood |
| 5 | Plant | Overcrowding, damaged roots |
| 6 | First watering | Too much water on day one |
| 7 | Break-in period | Sealing the lid too soon |
| 8 | Seal for good | Panicking at normal early fog or fuzz |
Step 1: Choosing a container
The container decides more of the outcome than any layer that goes inside it. A closed build needs a lid that can actually seal, or at least sit close enough to trap humidity, since the entire method depends on the water cycle staying inside the jar rather than escaping continuously.
The mistake at this step is picking a container for how it looks rather than how it works. A narrow neck looks striking on a shelf and is genuinely difficult to plant, prune, or clean once anything is growing. Tinted or colored glass filters the light plants need, sometimes enough to matter. A jar with a loose, non-sealing lid, or no lid at all, cannot run as a closed system regardless of what goes inside it. For a first build, a straight-sided jar with a wide opening and a lid that closes fully is the easier and more forgiving choice, and it is what the main build guide works from as the default.
Step 2: Sterilizing before anything goes in
The mistake at this step is treating sterilizing as optional, or reaching for materials collected outside without preparing them first. Substrate, hardscape, and containers can all carry mold spores, insect eggs, and other organisms that a sealed, humid jar will happily grow. What is a minor issue in an open pot with airflow becomes a head start for mold in a closed one.
This is worth doing properly rather than skipping under time pressure, and the sterilizing guide covers the method for the jar, the substrate, and any wood or stone going in, including what boiling water and oven heat can and cannot do safely.
Step 3: Building the layer stack
The mistake at this step is copying a generic layer order without sizing it to the actual container. Most guides describe the stack in vague terms: a layer of gravel, a layer of charcoal, a layer of substrate. None of that is wrong, but “a layer” means something different in a 1 liter jar than in a 10 liter one, and getting the drainage layer too shallow is one of the most common causes of a waterlogged build later.
The general order is a drainage layer at the base (gravel or LECA), an optional barrier layer to keep substrate from washing down into it, then the substrate itself. The layer depths by jar size article sizes each layer to actual container volumes rather than leaving it to guesswork, and the drainage layer and substrate mix guides go deeper on why garden soil and an undersized drainage layer are two of the most common early failures.
Step 4: Placing hardscape
The mistake at this step is using fresh wood or stone straight from outside without preparing it. A piece of driftwood or bark that looks fine on a shelf can carry mold spores, insect eggs, or residual sugars that feed exactly the kind of fuzzy growth new builders panic over in week one. The hardscape guide covers which wood holds up in a sealed, high-humidity jar and which turns into a mold farm regardless of how it was prepared.
Step 5: Planting
The mistake at this step is treating a closed terrarium like a normal pot: cramming in as many plants as will fit, and handling roots roughly on the way in. A sealed jar has a fixed, small footprint, and plants that look sparse on day one usually fill in faster than expected once the system stabilizes. Overcrowding leads to competition for light and airflow within the jar itself, which shows up later as dieback, and dieback feeds the mold and rot problems that most troubleshooting guides get asked about.
Handle roots gently, give each plant real space rather than filling every gap, and resist the urge to make the jar look “finished” on day one.
Step 6: The first watering
The mistake at this step is watering a sealed jar the way you would water an open pot. A closed terrarium recycles nearly all the water it starts with, since almost none of it escapes through a sealed lid. A light, even watering at planting time and restraint afterward is the standard approach; heavy watering on day one is the single most common reason a new build fogs solid for days and looks alarming before it has even had a chance to settle. The first watering guide covers what “a light watering” actually looks like in practice.
Step 7: The break-in period
The mistake at this step is sealing the lid completely on day one and walking away. A newly planted terrarium needs a break-in period, cracking or removing the lid for stretches over the first one to two weeks, to let the system find its balance before it runs fully closed. Sealing too early traps whatever moisture level exists at that moment, for better or worse, before the build has had a chance to correct itself. The break-in schedule guide sets out a working timeline for when to vent and when to close.
Step 8: Sealing for good, and what to actually expect
The mistake at this step is panicking at what a settling terrarium normally looks like. Some fogging, a flush of white fuzz on the substrate, and mild transplant stress in the first weeks are common and usually resolve on their own as the system stabilizes. Tearing a jar apart in week two over something that would have cleared by week four is a frequent and avoidable setback. The stabilization timeline sets expectations for how long that settling period actually takes, and building in an already-humid room changes some of these timelines, which the humid climate build guide covers directly.
What to do if something looks wrong anyway
If fog, fuzz, or a leaf color change does show up and does not look like the normal early-weeks pattern described above, the troubleshooting guide starts from what you can actually observe (the glass, the substrate, the smell) rather than a list of named problems, and routes each symptom back to the build step most likely behind it.
FAQ
Do I need a specific “terrarium kit” to build my first one?
No. A wide-mouth glass jar with a lid that closes, a drainage material, activated charcoal, a suitable substrate, and appropriate plants cover the actual requirements. Kits bundle these together for convenience, not because the components are special.
How long does the whole build take, start to finish?
The physical build, layering and planting, typically takes well under an hour for a single jar. The break-in and stabilization period afterward is measured in weeks, not the build session itself.
Is it normal for the glass to fog heavily right after building?
Some fogging in the first days is common, especially after the first watering. Heavy, constant fog that persists for a week or more without ever clearing points to too much water going in at the start; see the too much condensation guide for how to read it.
Can I use plants and materials I already have at home instead of buying new ones?
Often yes, provided the plants suit high, constant humidity and the materials are cleaned and sterilized first. What matters is suitability for a sealed, humid environment and proper preparation, not where something was sourced.
What is the single most common reason a first terrarium fails?
Overwatering at the first watering step, combined with an undersized drainage layer, is the most frequently cited cause across build guides and troubleshooting pages alike. Both are addressed directly at steps 3 and 6 above.